Introduction
introduce the way of using lil-gui in vue3
起因
起因是在写 multiple sequence alignment 项目中,需要有个控制各个组件的控件和界面上的交互, 而之前我们在项目中的 ui 一般会使用 antd,所以在该项目以然沿用了这个 ui,但在完成功能后 leader 告诉我 说像这种后面可能会开源的项目需要尽可能地脱离掉对 ui 库的依赖,更多是是使用原生的元素,后来给我推荐了个 ui 控件也就是今天要介绍的主角 lil-gui,它的优势是样式上高度统一,以及支持监听变化和自定义控件
正文
我使用的框架的是 vue3,包管理器是 pnpm 首先是安装依赖
pnpm add lil-gui
然后引入依赖
import { GUI } from 'lil-gui'
我们刚才引入的 GUI 实际上是一个类,所以它的使用方式是需要先实例化
const gui = new GUI({
  width: 280,
  title: 'Setting',
})
//可以传入一些属性进行自定义:
//例如 gui的宽度width, 标题title, 渲染在哪个容器上container
还有些参数
autoPlace?: boolean;
closeFolders?: boolean;
injectStyles?: boolean;
touchStyles?: number;
parent?: GUI;
然后我们可以先准备好一个控件的配置对象 不同的值类型代表不同的控件 gui 可根据值类型选择渲染哪个组件
boolean => Checkbox
function => Button
string => Text field
number => number field
array => Dropdowns
举个例子
const showConservationComponent = ref<boolean>(true)
const controlRange = ref<number>(50)

const configObject = {
  conservation: showConservationComponent.value,
  slider: controlRange.value,
}

//第二个参数即为需要配置的key
//支持链式调用,添加完控件后可直接监听change事件
gui.add(configObject, 'conservation').onChange((value) => {
  showConservationComponent.value = value
})

//后面的三个参数即为slider所需要的常量最小值、最大值、间隔值
gui.add(configObject, 'slider', MIN_CONTROL, MAX_CONTROL, CONTROL_STEP).onChange((value) => {
  controlRange.value = value
})
具体的用法可参见官网 https://lil-gui.georgealways.com/ 在我的业务中还需要有上传文件的控件以及 select 的搜索(这里我去看下了 mdn 下发现可以使用 datalist 配合 input 实现),但在原生提供的控件中并不支持,然后在翻阅官方的 github 的 issue 中受到了启发 可以进行自定义控件,让我们来看看具体要怎么做
这里我定义了个 ts 文件命名为 lil-gui-input-controller.ts
import { Controller } from 'lil-gui' //包暴露出类的controller

//定义自己的controller 去继承提供的控制器
export class MyInputController extends Controller {
  $input: HTMLElement

  //默认类型为text
  //list是为了配合datalist使用,这里可以先不关注
  constructor(parent, object, property, type = 'text', list) {
    super(parent, object, property, `input-${type}`)

    this.$input = document.createElement('input')
    this.$input.setAttribute('type', type)
    this.$input.setAttribute('list', list)
    //关于aria-labelledby的介绍 https://developer.mozilla.org/zh-CN/docs/Web/Accessibility/ARIA/Attributes/aria-labelledby
    this.$input.setAttribute('aria-labelledby', this.$name.id)
    this.$input.addEventListener('input', (e) => {
      //这里为了能方便扩展,针对不同的type从目标上取值
      let value
      switch (type) {
        case 'text':
          value = e.target.value
          break
        case 'file':
          value = e.target.files
          break
        default:
          break
      }
      this.setValue(value)
    })
    this.$widget.appendChild(this.$input)
    this.$disable = this.$input
    this.updateDisplay()
  }

  updateDisplay() {
    this.$input.value = this.getValue()
    //返回指针以供后续链式调用方法
    return this
  }
}
在完成 ts 文件之后,接下来就是在 vue 文件中去引用了,这里写个稍微完整的示例
import { GUI } from 'lil-gui'
import { MyInputController } from './lil-gui-input-controller'

<script lang="ts" setup>
  //将之前提到的初始化和添加控件也放到init中
  const initControlForm = () => {
    //在GUI的原型上去挂载自己的添加控件的方法,这里我命名为addInput
    GUI.prototype.addInput = function () {
      return new MyInputController(this, ...arguments)
    }

    const gui = new GUI({
      width: 280,
      title: 'Setting',
    })

    //在先前的配置对象中追加自己的项,我这里写的是file
    const configObject = {
      conservation: showConservationComponent.value,
      file: [],
    }

    gui.add(configObject, 'conservation').onChange((value) => {
      showConservationComponent.value = value
    })

    //使用我们在原型上挂载的方法
    //根据我们定义的Mycontroller的传参,第一个参数是配置的对象
    //第二个是对象中指定的key
    //第三个是input的类型
    const fileList = ref<FileList[]>([])
    gui.addInput(configObject, 'file', 'file').onChange((value) => {
      fileList.value = value
    })
  }
  initControlForm()
</script>
这里可以提的一点是原生 input 标签的类型为 file 时是不支持 v-model 绑定的,只能使用 change 事件监听
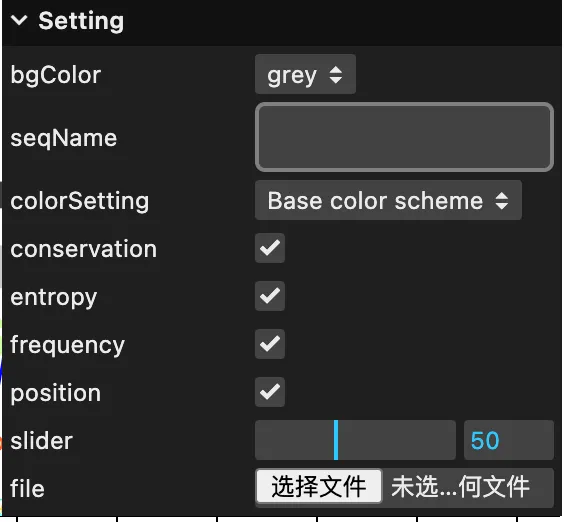
最后展示成品效果


